dev-kit-2020
Table of Contents
Chromation dev-kit firmware
firmware consists of C source files and build scripts. The
build scripts are for two targets:
- the microcontroller target
- generates AVR assembly
.elf - loads the
.elfin the AVR target Flash memory
- generates AVR assembly
- the unit-test target
- generates a test runner executable that runs on the development computer
- the test runner prints test results
The unit tests require mock-c. Folder firmware/mock-c/
starts out empty when you clone dev-kit-2020. To build the unit
tests, get mock-c by cloning the Git submodules:
git submodule init
git submodule update
mock-c requires installing GLib. Installation instructions are in the mock-c README.md.
Firmware documentation
The firmware is documented with Doxygen. View the Doxygen at
firmware/doxygen/html/index.html.
Navigate the project by clicking on Files on the top of the
screen, then either:
- click
File Listto browse the project by file - click
GlobalsthenAllto view an index of all globalVariablesand allFunctions
Firmware organization
The File List shows three folders:
lib- contains general libraries used by both PCBs
usb-bridge- firmware specific to the
usb-bridgepcb main()is insrc/usb-bridge.c
- firmware specific to the
vis-spi-out- firmware specific to the
vis-spi-outpcb main()is insrc/vis-spi-out.c
- firmware specific to the
Firmware conventions
Function names starting with underscore (_) are low-level, used
only within the function’s library.
Function docstrings start with a quick description of what the function does, followed by a bullet-list of specific behaviors that is auto-generated by the unit tests.
Breaking with C convention, most of the library functions are
defined in .h files, with the function signatures declared in
the .c file. This enables the compiler to inline functions
declared inline.
Most library functions are inline. This is a necessity on this
project because the microcontroller clock is only 10MHz. The code
does not execute quickly enough if the compiler does not use fast
I/O assembly instructions when possible.
To use these fast instructions, the compiler must know register and bit values at compile-time. It is too late to wait until linking the object files into the final executable. Object files generated without these values are forced to use the much slower, generic load and store instructions.
This break with convention only has one real drawback. It complicates faking functions for testing.
Unit tests
[ ] Add documentation for firmware unit tests.
File list
firmware
├── README.md
├── common.mk -- Makefile common to `vis-spi-out` and `usb-bridge`
├── Doxyfile -- Doxygen settings for firmware documentation
├── lib
│   ├── build
│   ├── Makefile
│   ├── src
│   └── test
├── usb-bridge
│   ├── build
│   ├── Makefile
│   ├── src
│   └── test
└── vis-spi-out
    ├── build
    ├── Makefile
    ├── src
    └── test
firmware also contains shell scripts and help messages for
programming the EEPROM in the FTDI chip on the usb-bridge PCB,
probably of no interest to most users:
firmware
├── Makefile
├── help.man -- Help msg printed when running `make` with no args
├── help-setup.man -- Help msg to setup firmware toolchain
├── help-board-common.man -- Help msg for `make` from board folder with no args
├── help-build.man -- Help msg for build from source
├── help-flash.man -- Help msg for programming Flash memory
├── help-ftdi.man -- Help msg for programming FTDI EEPROM
├── help-fuses.man -- Help msg for programming MCU AVR fuses
├── devcnt.sh -- bash script to parse temporary file `devscan`
├── ftcfg.xml -- Template config for FTDI EEPROM
├── kitnum.py -- Python script to generate new serial numbers
├── kitnum.sh -- bash script CLI to generate XML for new serial numbers
├── progkitnum.sh -- bash script to write the FTDI EEPROM
├── uservars.mk -- manually set path to ATmega DFP (Device Family Pack)
├── kits -- Kit data, sorted by serial number
│   ├── 0911-03 -- example kit serial number
│   ├── ...
│   ...
...
└── writexml.py -- create custom config from XML template
Dev-kit Flash memory programming
Overview
Use make to program:
- the FTDI FT221X EEPROM
- the kit serial number
- configuration for how the USB Bridge IC behaves
- the two ATmega328 microcontrollers
- Flash memory
- fuses
First time setup of a dev kit requires:
- two
makecommands for the FTDI chip$ make kitnum$ make progkitnum
- two
makecommands for each microcontroller.$ make fuses$ make flash
- and on Windows remember to enable
Load VCPin the Device Manager (necessary for USB communication with the kit using Python packagepyserial)
Once a kit has been programmed, updating firmware is just the Flash:
$ make flash
Enter the repo
Open bash (the Cygwin mintty terminal):
> bash
Enter the local directory for this repo
$ cd ~/chromation/dev-kit-2020/
Enter the firmware folder
$ cd firmware/
Program the EEPROM
Hardware setup:
- connect the dev-kit over USB
- if AtmelICE is connected, power it OFF
Check the dev-kit is visible:
$ make scan
Scanning connected USB devices...
Device 0: FT X Series, ChromationSpect-0911-03, CHROMATION091103
OK: One device found.
Program the serial number and configure the FTDI EEPROM:
$ make kitnum

Serial number: 1182-XX
Enter two digits to replace XX
...
make kitnum creates a sub-folder in kits/ and the EEPROM
config file for this kit
$ make progkitnum
...
Enter ENTIRE kit serial number, for example: 1182-01
XXXX-XX: 1182-03
...
Program the fuses and the Flash
- connect the Atmel-ICE programmer over USB and ISP
- flip the switches to program the
usb-bridge- slide black switch ‘‘left’’
- slide white switch ‘‘right’’
Program the usb-bridge microcontroller:
$ cd usb-bridge/
$ make fuses

atprogram.exe --tool atmelice --interface isp --device atmega328p \
        write --verify --fuses --values F7D9FF
Firmware check OK
Verification of write OK
Write completed successfully.

$ make flash

atprogram.exe --tool atmelice --interface isp \
        --device atmega328p program --chiperase --verify --file build/usb-bridge.elf
Firmware check OK
Programming and verification completed successfully.
avr-size build/usb-bridge.elf
   text    data     bss     dec     hex filename
   2980      96    1577    4653    122d build/usb-bridge.elf
Hardware setup:
- flip the switches to program the
vis-spi-out- slide white switch ‘‘left’’
Program the vis-spi-out microcontroller:
$ cd ../vis-spi-out/

$ make fuses

atprogram.exe --tool atmelice --interface isp --device atmega328p \
        write --verify --fuses --values F7D9FF
Firmware check OK
Verification of write OK
Write completed successfully.

$ make flash

atprogram.exe --tool atmelice --interface isp \
        --device atmega328p program --chiperase --verify --file build/vis-spi-out.elf
Firmware check OK
Programming and verification completed successfully.
avr-size build/vis-spi-out.elf
   text    data     bss     dec     hex filename
   3754     352    1577    5683    1633 build/vis-spi-out.elf
For first time setup, see the Setup instructions below.
Dev-kit programming setup
:rainbow: See the TiddlyWiki for instructions to setup the firmware (Flash/EEPROM) programming toolchain.
Open tiddler Use AtmelStudio:
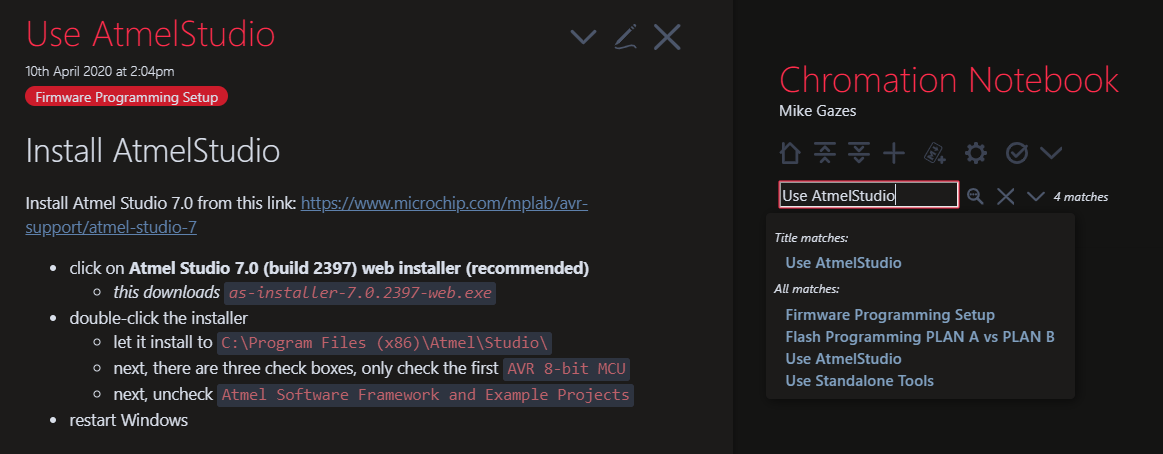
- type Use AtmelStudio in the search bar on the right
- click on the link Use AtmelStudio in the search results
- the tiddler opens on the left, as shown
The tiddler contains links to external websites to download tools and links to other tiddlers in the TiddlyWiki.